Saturday, February 28, 2009

Friday, February 27, 2009

More BUGS! - FOTD


These
sparkle sparkle's are some beauties by RoughFisher - who continues to be one of my favorite tiers! He's creative, ties with bulk craft material, ties nymphs and stoners, easy to tie patterns that are gorgeous!

Thanks again RoughFisher!

Did I mention the guy loves the rubber lips? even more reason to love the guy!

Thursday, February 26, 2009

DSLR Photography - Lenses

Gizmodo's - Why lenses are the real key to stunning photos. I am posting this link to have it on file when I need to look at - I don't understand DSLR's (or good photography for that matter), but I want to get one and learn how to take better pictures.

I need to find time (and money) to learn about DSLRs and eventually get myself a nice camera. I have talked a few times with my buddies Ryan and Charlie, who have both been paid for their pictures, but I need to take it more seriously.

Wednesday, February 25, 2009

Stoners

I was inspired by Singlebarbed's Mutt Stoneflies and decided to try and tie up my own. I haven't really tried to tie a stone fly before - mainly because I'm a midge guy and can't tie anything larger than an 18! These guys are tied on size 14's so this is a huge stretch for me!

Let me know what you think. I stuck with pure black models - black biots for the tail, black vrib for the segmented body, black wooly yarn for the body, black thin skin for the shuck and black ostrich for the hackle - with white and black rubber legs colored to taste for the legs.


Friday, February 20, 2009

Craft Store Finds

After work today Avelyn and I hit Michael's to find some cheap materials for my fly tying get together with my buddy Steffan next week. He's headed up to Alaska this fall and needs some big uglies for his trip. Although I don't think we'll tie any salmon flies, I wanted to teach him how to tie some streamers - once he gets the hang of it he can tie any colors he wants - including the oranges, purples, pinks and reds that he'll need.


I was a little disappointed in their selection - the store inventory has changed since the last time I was there - there isn't nearly as many cool beads, and none of that stretchy bead cord stuff that you can use on nymphs. But, they had some great stuff for streamers - including some hollow corded rope like materials that are really thin, and will lay flat. I picked up a silver and a silver/black mix - each was $1.49 for 10 feet. I also picked up some of this peacock eye lash ribbon - basically it is inch long strands of red, green, crystal green, and flashy green colors on a cord. The stuff will make great collars - it was $1.99 on sale. And I picked up some 6 mm silver beads - they are standard sized hole drilled through the whole bead, and I just tried it on a size 8 hook and the bead slid over the eye - so I guess maybe a size 6 hook would be better. These were $1.99 on sale as well.


Not too bad for a quick trip. I need to head to JoAnns - they seem to have the coolest stuff and obscure little items.

Thursday, February 19, 2009

Wow! Nice tat!


I'm not sure if this is a real tattoo - hell, I can't even find it on the
LINK provided by Moldy Chum, but it is a very cool looking tattoo. The detail on this thing is amazing!

Tuesday, February 17, 2009

Fly Tying Displays For Sale

I thought I had posted this a while back, but I guess not.

I make oak fly tying displays in several different sizes - all are solid oak, in either ebony black or sedona red, 3 coats of polyurethane, all have routered edges, felt bottoms, and include the mini grabbers for holding flies. The square displays are approximately 3.5" X 3.5" square. I make these in batches of 15 or so, and it will often take me a full week to finish them all. There is literally 20 steps to make just one of these - so the production line process takes some time.

I love making these, and do it as a hobby in my garage. I once saw these in a fly shop for $30 apiece, and thought to myself that I could make tehse better and for much less. That was about 2 years ago, and since then I have sold over 50 of these on eBay (user name brandon0722 - 100% positive feedback). I have done a lot of trial and error on these, looking for the best wood (definitely oak - the grain just jumps out at you), the right routered edge, the right colors (see the red and black below), the right amount of poly to make them shine, etc. I have perfected these and their quality is unmatched.

In the past I have donated these to the West Denver Trout Unlimited for their bucket raffle and for their monthly meetings. I haven't really tried selling these outside of eBay, but have been asked by a few people to start making them available. That means I will probably have to start adding inventory.

These are the most popular models I most often have in stock:

8 mini grabbers in Ebony Black and Sedona Red - approximately 3.5" X 3.5" square - sells for $13 + $4 shipping


11 mini grabber in Ebony Black (not pictured) and Sedona Red - approximately 7" X 3.5" - sells for $18 + $4 shipping


I have also done about 15 custom displays for various people who want larger displays for displaying salt water flies, or smaller displays for displaying only one fly (see the pics below). Let me know if you might have a idea for a custom fly tying display. Pricing varies based on how many mini grabbers, the wood and felt and stain and poly don't vary enough to cost more then the above displays. However, making one off custom displays may take longer than a week to produce.

These were salt water displays, in sedona red and were huge! 16" X 1.5"


This was a larger square version 5.5" X 5.5" for salt water flies.


This was a 5.5" X 5.5" square for salt water flies as well - I made this one a nice deep rich choclate brown color.


These were two mini-displays only 2" X 2" squares - they were stained in Ebony Black and the wood grain is amazing. This person wanted to show off one fly in a glass fly shop case as the centerpoint of the case.


Of course I sell the mini-grabbers separately as well - for 1-15 pieces the cost is $1.25 apiece, for 16-100 they are about $1.00 apiece (depending on how many I have at the time). I buy these in bulk (sometimes I have to buy them in 500 to 1000 quantities to get the price under $1 each) so I get a really good deal, but I'm not going to get rich on these things. Larger than 100 orders can be filled but may take some time.

Well, I hope you like my displays. Shoot me an email at brandon722@yahoo.com with any questions.

Fly Tying Photography - A Tutorial

My buddy Steffan brought this great site to my attention in the comments - check out WWW.FLYARTSTUDIO.COM it has tutorials to walk you through photgraphing your flies with a low end SLR or a regular point and shoot, gives you lighting tips, camera usage tips, etc. Not to mention he has some great bugs on there too - check out the lightning bug - one sexy midge that he takes seriously (and rightfully so!).


Thanks Mr. Osborn and Steffan!

Some of my own creations! FOTD

As most of my friends know, I'm a midge guy - my friends know this because I give them about a dozen everytime I see them, mostly all different too. I like tying midges because they are easy, small, use simple materials and I fish them 99.8% of the time.

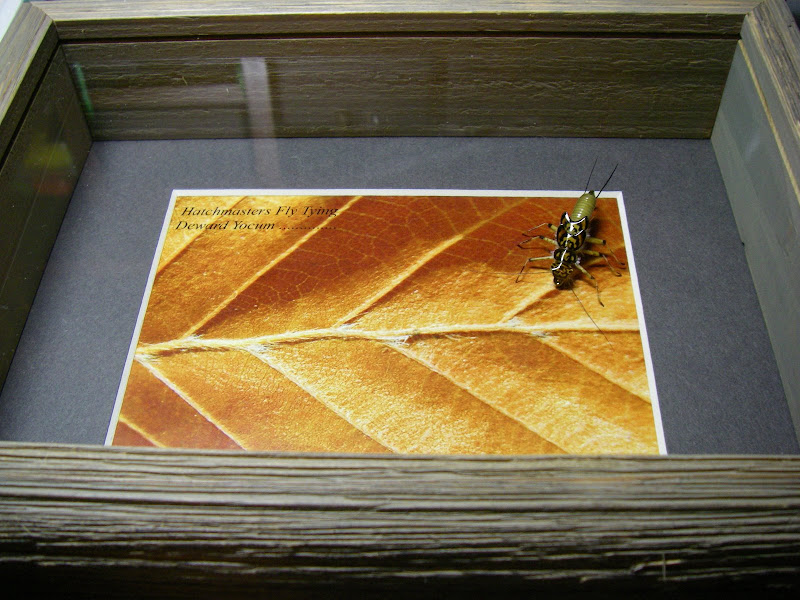
At the fly tying clinic on Saturday I met Deward Yocum, a San Juan River guide, expert fly tyer, and all around good guy. He showed me this cool material called Hairline Micro Tubing (now it's called micro hoolow tubing) and tied up a sweet looking midge on a Dai Riki 270 hook with a clear glass mirrored bead head and any type of dubbing behind the bead. He was tying in a yellow/light green color on red hooks, and the fly looked awesome. I have some of the same micro tubing in red and blue, but never figured out what to tie with it - until Saturday. I guess I had always known I could use the material, but tying the tubing in at the bottom of the fly always left a bulky bump that didn't look right. Deward showed me how to tie the material off behind the bead and wrap down to the bend of the hook, add a tight wrap and work my way back to the bead.

Well, when I got home I couldn't wait to try out the micro tubing and the new method to tie it in, and then to see what other types of tubing/floss I could use to tie up some midges. I tied a bunch, with a bunch of different materials.


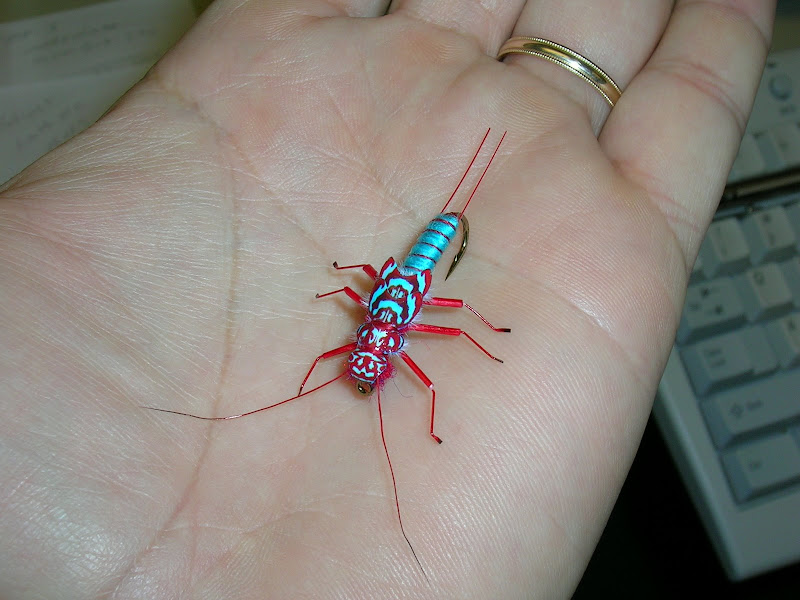
This first fly was with the blue micro tubing - and it looked great, just not really sure when I'd actually fish blue. I bought the micro tubing probably 2 years ago when someone showed me on the Bighorn that they were catching fish on electric blue midges. I may have tied about 10 blue wire brassie type flies and then never tied another again.


This is the best fly I tied, although the picture doesn't show just how flashy it is and how much the red has a metallic look to it. This fly will replace all of my red brassie type flies and I guarantee it will kill on the Horn.


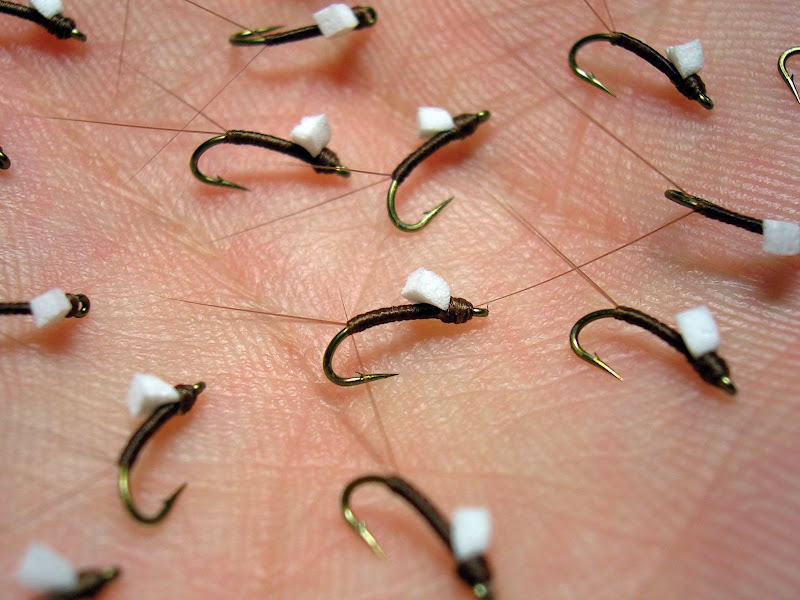
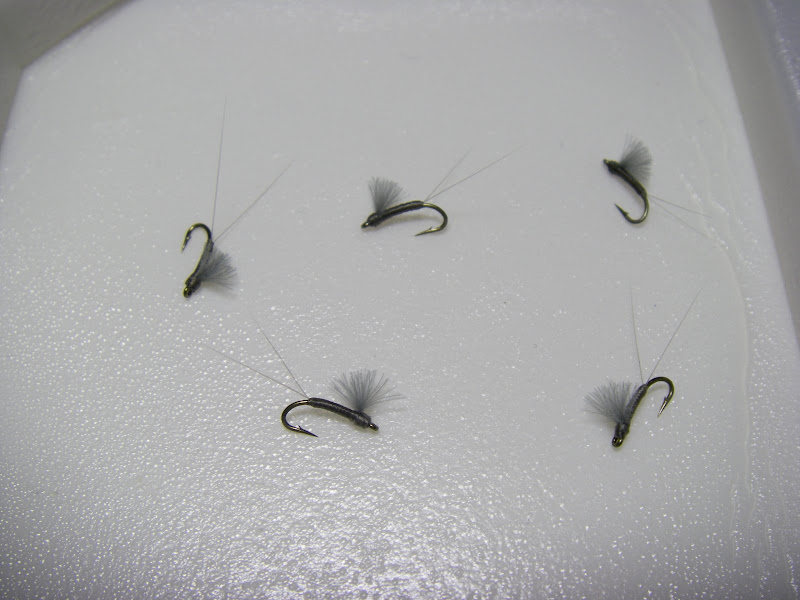
This is a fly I tied with the olive tubing that comes on spools, I think it is a lot like v-rib, I'm just not sure if it actually is v-rib. As you can see it doesn't lie completely flat when tying with it - it adds a nice segmentation and the color is awesome. One thing I didn't try (that I will next time) is to tie these flies with a white thread base first over the hook, then tie the tubing on top - I'm betting you get truer colors from your tubings (which is important with lighter colors like olive, yellow, pink, etc.).


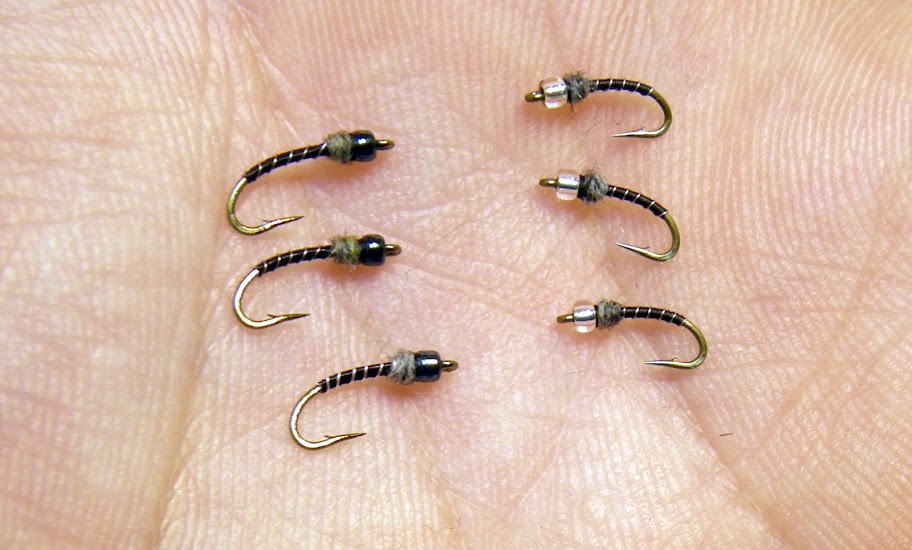
This fly is actually tied with Flex Floss - you know the stuff that you get 100 6-inch strings for like $2. I liked this stuff, but as you can see the color is muted and all blends together into a blah color. There is no defined sementation, but makes a killer caddis nymph immitation. I'm betting you could take off the bead, add only the black dubbed head and it would look exactly like one of those little caddis' you pinch out of it's shuck.


This is my secret weapon. Same colored Flex Floss, but I added two tricks. I underlayed the wire under the first layer of floss, and left it hanging at the tail of the fly when I wound the floss back to the eye. I then wound the wire back to the head - the wire seemed to fall between the segmentation left by the floss. The second trick was to add some nail polish to the fly and this made it all smooth and sleek. The nail polish made it glossy and jump out at you. I like this fly - more than I like the photo of it.


This is my immitation of the bug shown a few stories down - the floating/emerger midge type of fly that I can't wait to fish - but I need to get better at tying it before I decide to try it on the river. Basically it is black thread, wire, two tiny hackle tips, black foam and black ostrich. I substituted the ostrich because I don't have hackle that small in black.


These flies were super easy to learn, tie, and fish. These are my favorite types of flies.

Let me know if anyone wants samples of the flies or the materials (I have tons of the floss). If anyone has Hairline micro "hollow" tubing they want to donate, I could use the practice and tie you up a few at the same time!!

The SEAL - FOTD


This bad boy is a nice looking fly. Simple, yet effective, and decent photography. I like it. Thanks Roughfisher!

Monday, February 16, 2009

Good photography

I have seen lots of great patterns in person at tying shows, shops, in friends fly boxes, etc. It is just a shame that few of them look even half as good on the internet, in a photo or in print. I mean, a fly is only as good as the image it leaves in your mind - and getting a first view of a great fly that is out of focus, has a distracting background, bad lighting or any other number of factors that make a photograph look horrible - ruins the fly.

I have stolen lots of photos online of nicely tied and more importantly PHOTOGRAPHED flies. It's too bad I have run out of material to post here. I mean, there are numerous beautiful flies out there - but beautiful photos of those flies do not exist - otherwise they would be posted here.

This is a call to all of you fly tyers out there - take the time and properly photograph your flies. Be creative, use the macros setting (all cameras have one - learn to use it correctly), select cool backgrounds and get good lighting. I created a lighting box for my flies - I use a regular lamp, a flash light, a tin foil base and a normal point and shoot camera to take pictures of my flies. And although my flies aren't professional quality, they are still miles ahead of most of the crap you see posted in the Fly Tying Forums database.

Just by looking at some of the photos on this blog you can see what makes a good photo - pure white background with the fly sitting on it works great (shadows sometimes create some great effect), a multi colored photo like the stonefly below (brings out the color in the fly), a piece of wood with the flies stuck into them (the tone of the wood catches the eye) or simply showing the bug on your fly rod/reel (in action photos are classy).

Here are a couple of photos that I shot that I really like - notice that they all are a bit of the same, but all are a bit unique (focus, lighting, shadows, contrast, how the flies are situated).


Saturday, February 14, 2009

West Denver TU - Fly Tying Clinic 2009

This morning Avi and I hit the fly tying clinic put on by the West Denver TU. I have a bunch of friends who tied at the event, including Chad Gauerke, Carl Pennington, Mark McMillan, Mark Tracey, Bill Searles, John Gordon and a couple of others. It was the usual cast of characters - and lots of good flies tied. I'm not much of a fan of sitting down and watching other people tie - but I need to learn to become one. I spent a bunch of time trying to keep Avi out of trouble and entertained. Not an easy task.

I did sit down and chat with a tier who I had heard of before, but had never met personally. I sat down more out boredom and watiing for Bill's table to clear, but I am glad I did. The table I sat at was with Deward Yocum, from the Durango area in southwestern CO. I had heard of him before, and probably seen him at a fly tying event, but as usual my ADHD never let me sit down and learn anything from these guys. What caught my eye at Deward's table was this beautiful stonefly that he had tied.


The fly was in a frame (this frame to be exact) and was huge - but it had amazing detail and looked professionally tied - I was pretty impressed. We started talking about it and he told me exactly how to tie it - which was great, except for the fact that I wouldn't even think about trying it.


After sitting with him for a few minutes he showed me another pattern - more along my style - midges!! That's what I liked about Deward, he tied some pretty crafty midge patterns, all that I could tie on my own. I didn't think he could show me anything new about tying midges, but I was wrong. He showed me this great little pattern on a red hook, size 20, with a red bead, yellow/green micro tubing, and some red dubbing below the bead. The fly was simple, but elegant, and perfectly tied. I couldn't imagine how he tied in the microtubing without a big bunch mark right at the end - so he showed me a trick. wrapping teh micro tubing down tightly (starting at the bead) and then at the bend of the hook letting up a little and wrapping it back to the top - the fly looked perfect!

He had a bunch more killer patterns - including:


All pics were taken by Deward Yocum of his own flies - see him at: WWW.IFLYTIE.NET

I saw Chad a couple of times (I had taken his father in law - a Yankee fan - BOOOO!! - with me) and he was tying up his secret caddis pattern, and promised to show me how to tie the stonefly pattern (yeah right - we'll see!). I didn't have a whole heck of a lot of time to hang out with him - but I'm glad we finally got to see each other.

Wednesday, February 04, 2009

Monday, February 02, 2009

Redheaded Beauties - FOTD

These streamers look very nicely tied - great coloring and those are the new eyes that are part of the same bead. I like them - and they seem like a straight forward tie.

Sunday, February 01, 2009

Super Bowl Champions...again!

I'd like to say I knew the Steelers would win the Super Bowl before the season even started - but no one would have believed me. How did I know? Well, history repeats itself of course.

You see, this is our prior timeline:

October 2004 - Red Sox win World Series
August 2005 - Avelyn is born
February 2006 - Steelers win the Super Bowl

October 2007 - Red Sox win the World Series
December 2008 - Zachary is born
February 2009 - ???

So, as you can see it was a forgone conclusion. Jennifer and I did our part and the Steelers held up their end of the deal.

Congrats to the Pittsburgh Steelers and all of Steeler Nation.